A Beginner’s Guide to SOLIDWORKS

A Beginner’s Guide to SOLIDWORKS
Do you want to learn SOLIDWORKS? You’ve come to the right place, Mako GmbH has got you covered! Whether you are learning SOLIDWORKS as your first Computer Aided Design (CAD) package or augmenting your software portfolio, this guide will go through the information you need to get you up and running in no time!
Step 1: Know your SOLIDWORKS Resources
Good News: This is a very important software to learn and you are not the first person to do this! Mako GmbH is helping people just like you to learn the software on a daily basis. The SOLIDWORKS community can also provide a ton of valuable material to augment your learning experience. Here is a list of the resources that you should become familiar with:
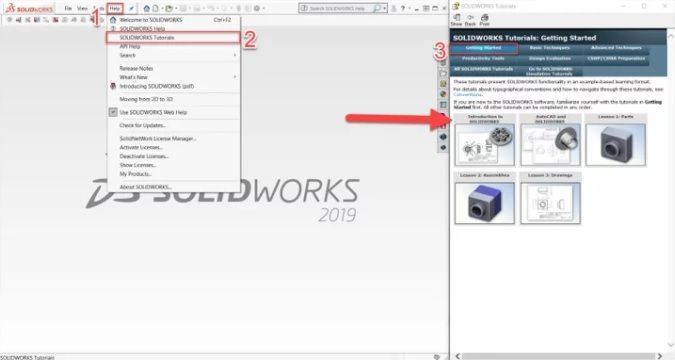
Tutorials
Did you know that SOLIDWORKS has built in Tutorials to teach you the software? Located under Help (1)> SOLIDWORKS Tutorials (2) > Getting Started (3), there are a series of hands on tutorials that will walk you through learning the basics of the program.
Blogs & Forums
Well you already found this blog, so you are on the right track! From walkthroughs to tutorial videos to Q&A threads, the SOLIDWORKS community is here to help you succeed. No matter your skill level, there is tons of value to be gained from interacting with other users who have the same questions as you. You can learn a great deal about all the CAD software from our blogs.
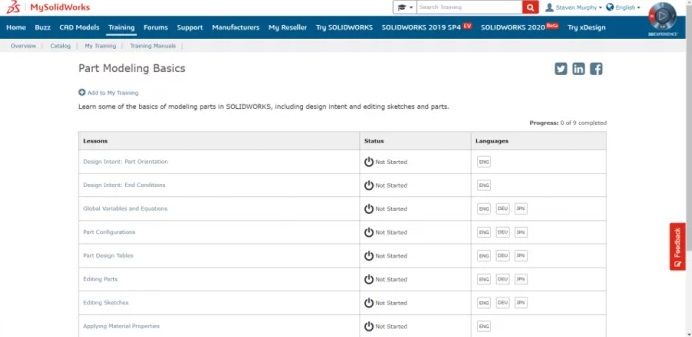
My.Solidworks.com
Provided by SOLIDWORKS, MySolidworks contains many training paths (each training path is composed of many individual topic videos) targeting a specific workflow of the software. Use these to your advantage to learn about areas of the software that is relevant for your profession. I would suggest starting with the “Part Modeling Basics” learning path.
*Note: online training works best when it is used to augment in person training! Good modeling habits developed in the classroom have more staying power and will serve you better in learning the software.
Step 2: Learn the User Interface of SOLIDWORKS
Mako GmbH will guide you step by step to learn the SOLIDWORKS user interface. A key portion of getting used to any new software is learning the user interface (UI). You want to be comfortable navigating through the menus. Here is a brief description of the key UI elements for getting started:
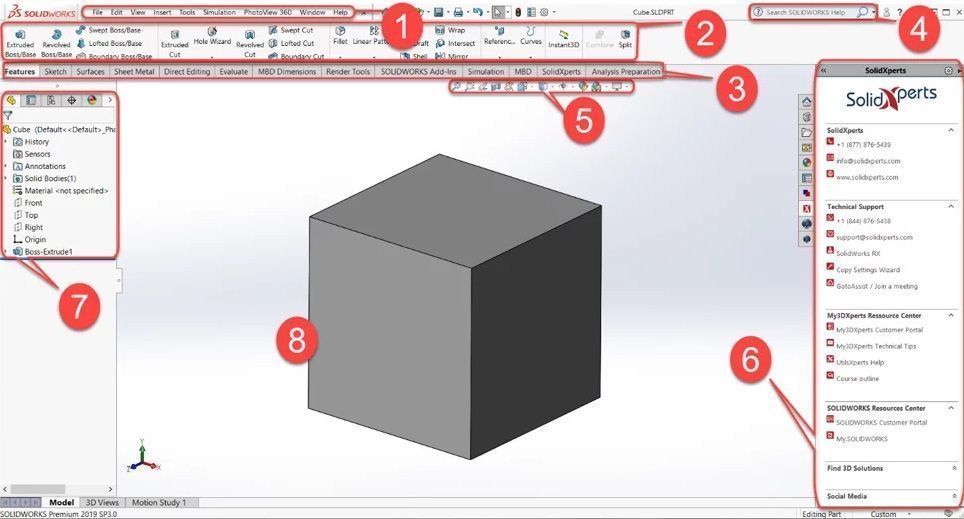
Menu Bar
The Menu Bar contains a set of the most frequently used tool buttons from the Standard toolbar, the SOLIDWORKS menus, the SOLIDWORKS Search, and a flyout menu of Help options.
CommandManager
The CommandManager is a context-sensitive toolbar that dynamically updates based on the toolbar you want to access. By default, it has toolbars embedded in it based on the document type.
CommandManager Tabs
When you click a tab below the CommandManager, it updates to show that toolbar. For example, if you click the Sketches tab, the Sketch toolbar appears.
SOLIDWORKS Search
You can use SOLIDWORKS Search to find information in documentation and forums. You can also find files and models, and find and run a SOLIDWORKS command with just a few keystrokes.
Heads-Up Toolbar
A transparent toolbar in each viewport provides all the common tools required for manipulating the view.
Task Pane
The Task Pane provides access to SOLIDWORKS resources, libraries of reusable design elements, views to drag onto drawing sheets, and other useful items and information. The SolidXperts custom task pane (part of UtilsXperts) has all of our contact information, tools, and custom macros to help our customer base take full advantage of the SOLIDWORKS software.
Feature Manager Design Tree
The FeatureManager design tree on the left side of the SOLIDWORKS window provides an outline view of the active part, assembly, or drawing. This makes it easy to see how the model or assembly was constructed or to examine the various sheets and views in a drawing.
Graphics Area
The graphics area displays and lets you manipulate parts, assemblies, and drawings.
Step 3: Get Comfortable with the Basic Features
Now it is time to start using the program. As suggested earlier, check out the tutorials as they provide a solid explanation of the primary features used in CAD. Since the majority of CAD work only uses a fraction of all of the features available in SOLIDWORKS, focus on understanding these commands to start. Most people find that once you understand the thought process behind the below features, it is really easy to learn the rest! Focus on:
Sketch
When you open a new part document, first you create a sketch. The sketch is the basis for a 3D model. You can create a sketch on any of the default planes (Front Plane, Top Plane, and Right Plane), or a created plane.
Boss Extrude
The primary method of converting 2D sketches into 3D geometry, the Boss Extrude feature allows you to add with depending on several conditions to your part. You will need to either have a sketch or create a sketch in order to create an extrusion!
Revolve
Revolves add or remove material by revolving one or more profiles around a centerline. Use these to create cylindrical or spherical parts in a single feature! A perfect example of a revolve would be a soda can.

Extrude Cut
Want to remove some material? The Extrude Cut features allows for you to get rid of material on your part. Be aware that you need to have material before you can activate the extruded cut command.
Hole Wizard
If you are looking to make any type of circular hole, look no further! The Hole Wizard contains specifications for the majority of holes, and even lets you bring that information into your 2D drawings automatically. Just select your Hole type, Size, and Location to make your first hole.

Step 4: Start Modeling
What’s next after learning the above functions? Try to create Models. What about your pen, book or even your phone? Model them! The more you work to understand completed parts as a combination of extrudes and cuts, the easier it is to CAD. There is no “secret” to getting good at modelling besides practice. So get going and start modelling. At the end of the day, it takes time and a positive attitude to go from a casual user to being a master modeller.
So there you have it! Remember the following steps and you can achieve what you desire with SOLIDWORKS. Practice makes it PERFECT!
- Know your Resources
- Learn the UI
- Get Comfortable with the Basic Features
- Start Modeling
After mastering the above, if you want to explore more about Reverse Engineering, more CAD software and how to master them, check out our Blog Posts here or contact us here to get in touch with a Reverse Engineering expert!


There are no comments